2 - Domain Blocking Settings
Return to Guides | Return Home | Previous Guide | Next Guide
This guide will give you the information that you will need to know in order to use the domain blocking tools to block specific domains for some purpose, without blocking the whole category. This can also be helpful when blocking domains that do not specifically fall into one category.
STEP 1:
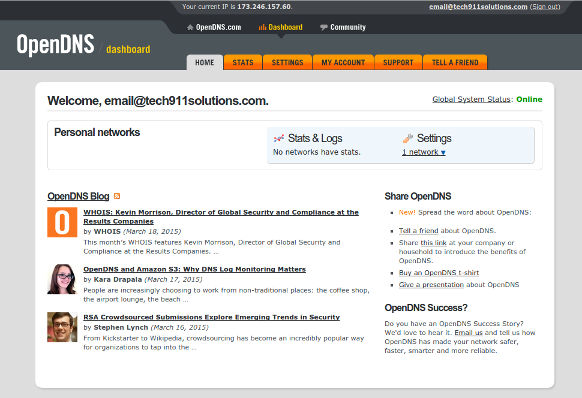
Login to the OpenDNS account you wish to configure. It will bring you to a page that should bring you to your dashboard home page, which should look somewhat like this:

STEP 2:
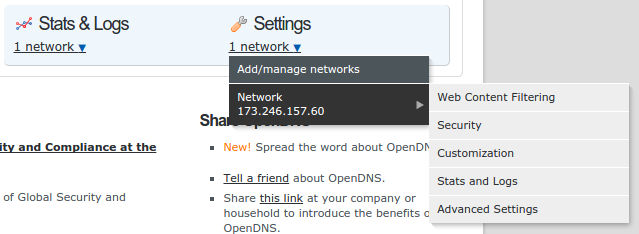
Click on the link that says "1 network" under "Settings" in the blue box near the top right of the page. When you do, you should see this:

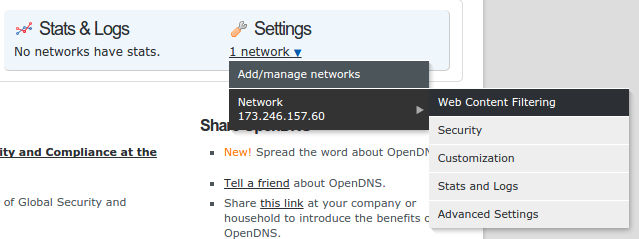
Click on the network you wish to change. You will see a sub-menu pop up, which should look like this:

Click on "Web Content Filtering" to open the page where you can specify the specific domain(s) that you wish to block out. Optionally, this is where you can also list domains to specifically allow, even if they're listed in a category that you have blocked.

STEP 3:
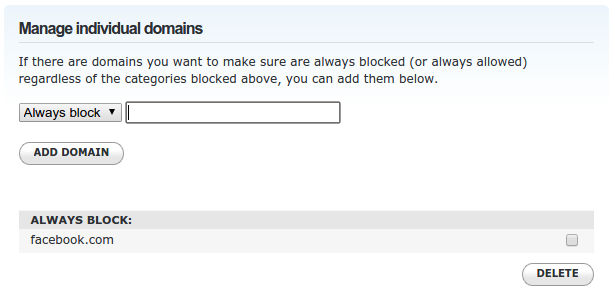
By default, no domains will be configured to be blocked out, unless they are included within a category that you have checked off in the box above in the Parental Controls Guide. This box will also allow you to specifically allow (or whitelist) domain(s), even if they are blocked out by a category that you have chosen to block. To begin this process, scroll to the bottom of the page. What you are looking for will be the box that looks like this:

By default, the sysem will assume that you're going to block a specific domain. If you wish to allow one that is blocked in the list of categories but you choose to allow it anyway, change the drop down box to "Never block" before finishing the next step.
STEP 4:
Click on the text box to type in the domain that you want to block or force to be allowed. The system will only allow you to add one domain at a time. When you see the cursor flashing, type in the domain name (e.g. facebook.com) that you want to block. It should look like this:

Click the "Add Domain" at the bottom left corner of the box to save the setting to either block or manually allow the specific domain.
When you are prompted with a confirmation message asking how you would like to block the site, click the "Confirm" button to add the domain to the list. The message you will receive should look like this:

When the domain has been blocked (or allowed) successfully, you should see the page refresh with the domain listed below the box as in the example below. Also, once a domain has been added, it can be removed from the list by clicking the check box for it, then clicking the "Delete" button at the bottom right corner of that box.

Note: If you wish to allow a specific domain that is blocked because of a category that you have enabled, when doing step 4, simply change the drop down box from "Always Block" to "Never Block" before you save the setting for that particular domain on the list.
Return to Guides | Return Home | Previous Guide | Next Guide
"Daddy I love you!"
Yours Forever,
-- Your Personal Pet


